HARDPAN LAYERS. Strip-till and no-till are recognized for their ability to reduce compaction, but compaction layers can still be more prevalent than many farmers think. Often time, the only way a farmer can be sure about how deep and thick their compaction layers are is to go digging for them.

Photo Courtesy of Kevin Kimberley


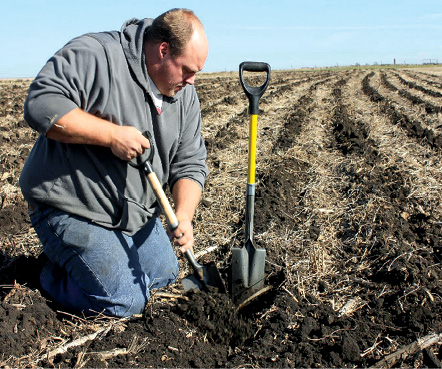
If working with farmers from eight states for more than 15 years has taught Kevin Kimberley anything, it’s that farmers should let the soil dictate their management decisions.

To hear what the soil is saying, though, growers need a good shovel, says the owner of Kimberley Ag Consulting, in Maxwell, Iowa.

At the 2nd annual National Strip-Till Conference held this past August in Iowa City, Iowa, Kimberley told strip-tillers that diagnosing ailing crops is often as easy as peeking just beneath the surface of the soil.

Voids in the Strip

When digging for answers, there is technique to consider.

“We’ll usually start by making a test strip,” says Kimberley. “Then we stick a spade straight down into the strip and dig out in front of that so you can see the profile. Then I look for holes or voids at the bottom of the strip.”

Kimberley often finds that farmers’ knives or coulters on their rig are blowing soil out of the strip rather than cutting through, which can cause a void at the bottom of the strip that runs its length. An empty space at the base of the strip compromises the seedbed.

Strip-Dig

DIGGING FOR ANSWERS. To have a good look at the strip profile, a proven practice is to dig straight down with a spade and dig out behind that area to check for voids and soil structure.

Photo Courtesy of Kevin Kimberley

To remedy the problem he takes a number of approaches, such as changing knives and coulters. Many of his clients now carry an equipment arsenal and rotate the setups for the best results.

“Most of my clients have about five coulters and several knives now,” Kimberley says. “Often, we change them out every year. It’s a money maker. For instance, if it’s too wet one year, we go in using a straight coulter, as it will pull the dirt loose.

“Same with the knives — sometimes we’ve got too much of an angle. The wetter it is, the straighter and sharper the knife should be, and there should be a hook to it. We want to boil dirt, not blow it out of the strip. We want the dirt to come back around the knife and close so we don’t have a hole. Using a very pointy knife can warm up the soil by 15 F by the afternoon.”

Controlling depth is another consideration related to voids. Kimberley makes sure his clients’ coulters are set at the same depth as the knives to avoid leaving a hole.

Although it can be frustrating for farmers to make alterations rather than run their strip-till row units straight from the factory, Kimberley says that looking at the soil and reacting accordingly is just prudent practice. Even if one of his farmers can’t find a knife that the situation calls for, he suggests making one.

“We weld, grind and cut — we do whatever it takes to make a knife work,” Kimberley says. “When you’re buying a $130,000 piece of equipment, you feel like it’s got to work as is. But if that ground’s telling you something different, it pays to make changes.

“One time, we found a mini mole knife from Weiss that was sharp all the way up, but it wasn’t long enough. So we welded an extra piece onto it for our clients. A lot of knives are too short. The soil will stick to the shank and drag, which starts pushing open a hole.”

The longer the taper on the edge, the better the knife will flow through the soil, he says.

Clods in the Strip

After digging out the test strip, Kimberley also examines the soil structure throughout the strip and says strip-tillers should do the same in their own fields. Clumps at the bottom or middle of the strip are also bad news.

“I don’t want to see clods in the strip,” Kimberley says. “I want the soil structure to be loose and uniform. If there are a lot of clumps, it’s more likely that you’ll have holes in the strip — it’s the same as being able to pack crushed ice but not being able to pack ice cubes.

“Clods all the way down will also lead to washout. With a little incline and airspace between clods, rainwater will pick up velocity and cause real problems. ”

To address heavy clods, Kimberley suggests adding 13-wave coulters to the back of the row units.

“The wave of the coulter will help fracture clods,” he says. “If you’ve got a disc, it’s smooth. So when these clods come through the coulters, they’ll have fracture cracks in them. Another smack breaks them into even smaller pieces.”

Spotting Compaction

Although strip-till and no-till practices are lauded for their ability to reduce compaction, Kimberley suggests that thick hardpans are still more prevalent than many farmers think.

“Root mass and water transpiration are key factors in yield, but if a farmer is just getting by with what’s normal for him, without knowing what’s going on in the soil, Mother Nature is going to eventually fail him,” he says. “Back in 2012, we had about 6,000 emails from farmers, including no-tillers, asking why all their corn died. It turns out that a lot of their roots were flat.

“To this day, most farmers don’t think they have the hard pan, but they won’t know unless they look.”

To find hardpans, Kimberley suggests pulling out a shovel and a sturdy knife.

Strip-Dig

STRIP GAP. The first thing strip-till consultant Kevin Kimberley looks for in a strip is uniform soil structure. A gap, hole or void will compromise the seedbed, and may be a product of the farmer’s row unit knife or coulter set-up, he says.

Photo Courtesy of Kevin Kimberley

“We’ll use a buck knife, one that’s very tapered,” says Kimberley. “I’ll dig down and slide the knife in the wall at the deepest point, then I’ll pull it up toward the surface until I feel the hardpan through the resistance on the knife. We use same knife all the time to recognize the feel on the handle.”

Through this method, he’s able to find distinct layers of compaction, along with their depth and width. Corn crown roots often struggle to break through heavy compaction layers, especially if the layers are close to the surface, which can result in flat roots and poor water infiltration.

“Root mass retards at 300-350 pressure per square inch (psi),” Kimberley says. “Ripper shanks start tripping at around 2,800 psi. I’ve been on some farms where we couldn’t keep the rippers in the ground. What does that tell you?”


Strip-Dig

“With the knife, I always change it to match the soil. I try different styles and see what each does until I find the best…”— Kevin Kimberley


A newer client of Kimberley’s in South Dakota who has been no-tilling for 32 years recently sought his advice in their struggle with heavy compaction. Shortly after Kimberley arrived on the farm, he determined that compaction was causing flat root structures in their corn, which was destroying yield potential.

“When I first met them, their corn yield was around 80 bushels,” he says. “We’ve been able to get them to an average of 146 now by breaking up that compaction.”

Kimberley has also seen success with inline ripping as a method for fixing compaction.

“Last year we used an inline ripper with ¾-inch shanks on about 10 of our clients’ farms to break up compaction,” he says. “The key is to offset the shanks about 12-16 inches, because we don’t want to blow the soil apart. We’re just looking to work a zone so our roots, water and nutrients will get through.”

Row Unit Setups

While Kimberley stresses that each farmer’s circumstances are unique and need to be addressed as such, over time he’s developed a baseline row unit setup that has worked well for many of his clients — starting with a trash wheel.

“For most of our guys we run a trash wheel out front,” he says. “When I look at trash wheels, I look for the widest it can cover to move trash. Behind that, we usually go with a turbo coulter. Depending on conditions, we may put a ripple or straight coulter there, though.”

To avoid blowing chunks of soil out of the strip, Kimberley suggests including a set of adjustable twin coulters behind the first coulter.

“We used to have to slide it on the bar to adjust, but with a new coulter design Waco Industries came up with, you can adjust them side to side by just pulling a pin,” he says.

“Behind that we have our closers. I like a 13-wave coulter because it won’t cut into the dirt as deep — the curve keeps it out of the ground. Also, as it’s running, it helps fracture the soil and build the berm.

“As for the knife, I always change it to match the soil. I try different styles and see what each does until I find the best.”

Get Planting Right


“With a little incline and airspace between clods, rainwater will pick up velocity and cause real problems…” — Kevin Kimberley


As with examining strips, Kimberley digs straight into the furrow when troubleshooting planting issues.

First, he tries to get a read on seed-to-soil contact. To do this, he recommends a surgeon’s delicate touch: He carefully trowels dirt aside with a flat edged tool, rather than digging for the seed with a finger. He says farmers often accidentally pack dirt around the seed while looking for it, which might make a farmer think they have more seed-to-soil contact than they really do.

“Roots don’t grow in air — they need to have full contact with soil,” he says. “We want that kernel tucked in tight. It will keep us away from cold-water inhibition too.”

Low seed-to-soil contact can often be chalked up to leaving a void in the seedbed with the strip-till rig, but misaligned press wheels can also contribute to this.

“We’ve seen misalignment of press wheels account for a loss of up to 20 bushels an acre,” says Kimberley. “Misalignment can leave the slot wide open and corn will come up unevenly because some kernels will be tighter than others.”

Adequate Down Pressure

While digging for kernels, Kimberley checks for seed depth and uniformity as well. But an even easier way to evaluate down pressure is to observe the planter in action, he says.

“During planting in Mitchell, S.D., we had 85 F and the soil crumbled in our hands,” Kimberley says. “We thought it’d be perfect, but we ended up with the planter pushing and lifting. Corn was being planted deep and shallow.

Strip-Dig

CHOKING ON AIR. Strip-till guru Kevin Kimberley says if the seed isn’t in tight contact with loose soil, stands will be reduced because seeds struggle to germinate in open air. Low seed-to-soil contact can be chalked up to a void left in the seedbed originally made by the strip-till rig, but misaligned press wheels can also contribute.

“We planted 60 acres before I figured it out. We pulled the press wheel bracket off and I drove beside the planter on a 4-wheeler. From there I could see the gauge wheel blowing up dirt from underneath. There wasn’t enough down pressure.”

In that instance, part of the issue was high-speed planting, which Kimberley is staunchly against.

“The faster you plant the more lift you have,” he says. “I think if we can get everybody to buy high-speed planters, we’ll get the corn market back again because yields will tank.”

Additionally, the width of the gauge wheels were contributing to the issue. The performance of narrow gauge wheels has Kimberley believing they offer many benefits for farmers.

“We’ve taken all of our clients to narrow gauge wheels already,” he says. “We have to push the outside lip of the furrow down to get that true V-shaped seedbed to form.

“When we were planting years ago we had wide gauge wheels because we all plowed. We needed the flotation because our planters sunk in the plowed soil. Now we’re driving on hard ground and it’s not sinking in, so we’re not getting the same down pressure.”

While riding alongside a planter in action, watching the parallel linkage is critically important, Kimberley says. If the parallel linkage isn’t level with the ground, there’s a good chance that there is insufficient down pressure.

kimberley kimberley

LEVELING LINKAGES. If a planter’s parallel linkage isn’t level with the ground, there’s a good chance there’s insufficient down pressure, Kevin Kimberley says. In the figure on the right, there is an angle on the linkage, which is likely to result in uneven planting. The figure above shows a linkage that is parallel to the ground as it should be.

“It’s key to have a level parallel linkage — you’ll have the best emergence, best seed placement and best depth control when you are level,” Kimberley says.

Some simple tweaks can be made to restore down pressure in circumstances when the linkage isn’t parallel to the ground.

“You can make a difference by just raising the tongue,” he says. “If the planter’s parallel linkage is not level, front to rear, the tractor hitch or mounting location on the planter frame wheels may need to be adjusted.”

He’s even taken it as far as actually customizing the planter itself and adding weight to recapture down pressure.

“The center of the planter is designed to be carried folded up, so wings aren’t going to have the same down pressure,” he says. “We had a 36-row planter and ran 18-20 pounds on the wing tires, and it helped immensely. Changing tires can also help get the planter lower to the ground and create leverage. We’ve put on 10-ply turf tires, which has also been helpful.”

The Right Attachments

Again, there’s no one-size-fits-all planter configuration, but Kimberley has his proclivities. Like the strip-till row units, he likes to lead with high-quality trash wheels.

“A floating trash wheel is key,” he says. “But I do try to stay away from any of the wheels that are pinned, they seem to always be digging and gouging.”

Behind these he runs narrow gauge wheels.

“We’ve gone to a narrow gauge wheel like Deere has used on their 1890 drill,” Kimberley says. “All of my clients are running the narrow gauge wheel so after the trash wheel makes its path, it’s easier to keep down pressure and control seed placement.

“Toward the back, we’re using a cruiser wheel to help with seed-to-soil contact. In drier conditions, we’ll use a rubber wheel because it’s easier to pack the soil.”

On the back, he uses a firming wheel to ensure uniform depth. On wet years, he’ll adjust it to a lighter setting. On dry years, Kimberley will use two rubber wheels on the firm setting to maintain capillary action and provide depth control.