If there’s a mistake to be made in no-till, Paul Jasa says he’s either made it himself or seen it done, and it’s clear that planting errors are high on the list of problems that can hurt no-till profitability.
Even though a drill or planter is only part of the no-till farming system, buying a no-till seeder and running it incorrectly is a sure path to failure, says the University of Nebraska Extension ag engineer and longtime planting and seeding expert.
Shortcomings such as drying out the soil, or failing to place seed at the proper depth, can lead to skippy stands, non-uniform emergence, and poor crop performance.
Deeper Thinking
Jasa told attendees at the recent Southern Soil Health Conference in Fort Worth, Texas, that he’s convinced that many growers plant too shallow.
“The No. 1 problem with no-till drills and planters is not having enough weight to get to the proper seeding depth,” he says. “My experience in Nebraska is that corn should be planted 3.5 inches deep and sorghum at least 2 inches deep in well-structured soil for better nutrient and water uptake.”
Jasa says growers have to watch out for proper down pressure on the drill or planter units, proper toolbar height to maintain down pressure, and consider using heavier springs and placing weights where they’re needed, such as on the end of the planter.
“If you’re having problems with hairpinning residue — which impacts the seed channel — you’re probably planting too shallow for the design of the planter,” Jasa advises. “If something plugs, such as residue movers, take it off. Look at what conditions the equipment was designed for, especially attachments.”
|
| CUTTING EDGE. When it comes to seeding through heavy residue, sharp opening discs can often do the job and negate the need for coulters on a planters and drills. |
Jasa says farmers may wonder if they need both a planter and a drill. Acreage to get across and the crops being planted are a factor. In some situations a planter can be used rather than a drill, but both can have their place.
“If you have lots of acres to cover planting corn and soybeans, having both a planter and a drill means that you only need a second tractor and a driver and you can run both at the same time,” he says. “Soybeans take a yield hit when planted late. Corn can be seeded with the planter and beans with the drill, so beans and corn can be planted during the same time period.
“You can even rent a drill and hire a planter driver and be ahead from a yield perspective if you’re planting late. My goal at Lincoln, Nebraska is to have corn, soybeans and grain sorghum all planted by May 1. Having both a planter and a drill helps to do that in a timely manner.”
Getting Planters Right
Jasa says the big issues with planters are not having enough weight, and not having the planter properly leveled.
If the nose of the planter is down, no-tillers aren’t getting good seed-to-soil contact and proper closing of the seed channel.
“The best way to properly level the planter is to have someone drive by with it in the ground as you watch,” he says. “You will be able to see if row units are coming out of the ground. The planter should cut residue, penetrate the soil, put seed in good contact with the soil, and close the seed channel.”
Ideally, the planter should be slightly tail down to get proper seeding depth. Jasa says that while checking the planter level, a pencil should be placed atop planter units as a simple test instrument.
“On our planter, the level is about right if the pencil rolls off of the back,” he suggests. Jasa also recommends a “practice run” with the planter in the field before planting time to pinpoint any potential problems while there’s ample lead time to get them fixed, “and to confound the neighbors into thinking it’s time to plant and they’re behind.
|
| SPREAD IT OUT. How evenly the combine spreads crop residue at harvest can affect the success of the subsequent planting operations in no-till. A residue spreader provides uniform residue height and spreading once a no-till system is in place. |
“Go to your field, under your conditions, two weeks before planting time. Run the planter empty—as that’s as light as it’s going to be,” he says. “First, check the toolbar height and the planter being properly level with the tail down in the back.
“Plant forward a bit, stop, and check the depth-gauge wheels. They should be in firm contact with the ground and not spin freely. They shouldn’t bounce. If the soil contact isn’t proper, you can add some weight or increase the down pressure. Lack of sufficient weight can mean the planter units slip and you get skips in the stand if the drive wheels are slipping.”
The Right Pressure
Using proper down pressure is crucial in no-till systems, as it keeps the row units on the ground. Jasa says that, according to research, 500 to 600 pounds of down pressure per row unit is required in most situations. In addition to the weight of the row unit, springs and weights create down pressure.
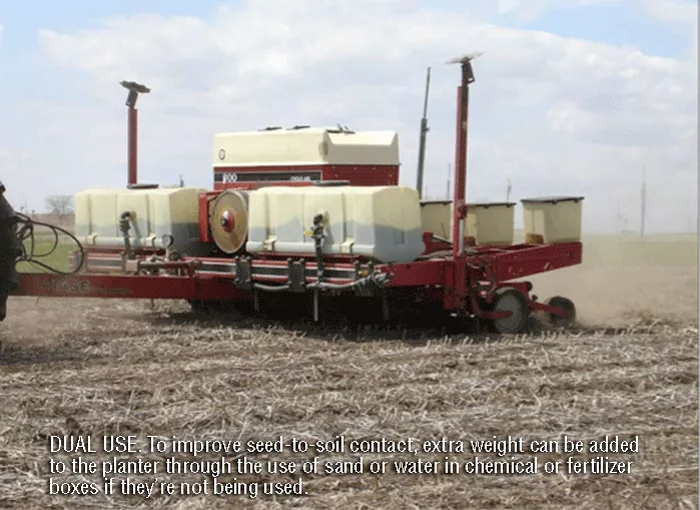
“If you have insecticide hoppers on the planter that you’re not using you can fill them with sand for more weight. The seed will add weight, but that runs out, and you can use cast iron suitcase weights,” Jasa advises. “If you don’t have insecticide hoppers or row-unit weights, down pressure springs can transfer weight from the tool bar to the row unit — the heavier the springs the more the pressure — providing more downward leverage.”
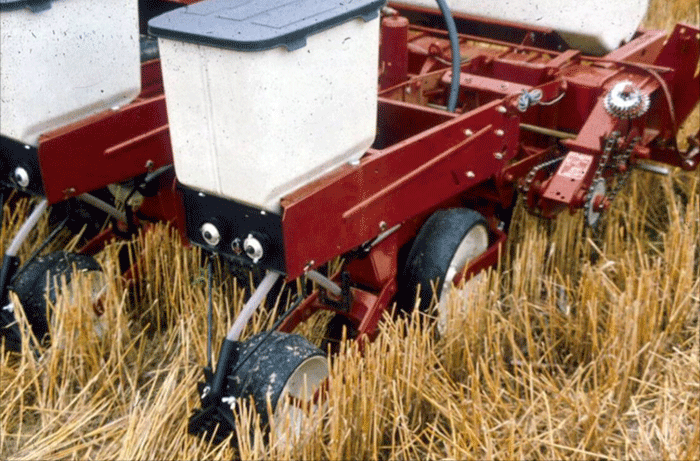
Opening discs on the planter should be sharp and working together, and discs and seed tube guards should be replaced when worn, Jasa says, adding that some aftermarket replacement guards are better than the factory originals as they reduce disc flexing.
He notes that thicker disc blades create a true U-shaped seed channel with a flat bottom, which is important to get optimum seed-to-soil contact.
Jasa says down pressure springs can become a no-till attachment that allows doing away with soil-disturbing coulters or residue movers. “Once residue is uniform, residue movers actually drive yield down. Today’s planters can handle residue, penetrate the soil to seeding depth, establish soil contact and close the seed channel.”
Tips for Drills
Three-point mounted no-till drills can have weight issues, Jasa says, and producers are better advised to use pull-types with weights added on the back when needed. Jasa feels that pull-type drills handle weight better than three-point models and cause less compaction on the end rows. Weight can be added to pull-type drills without having to carry offsetting weight on the front end of the tractor.
“Any time the back wheels of the drill or air seeder are coming up you’re losing seed-to-soil contact,” Jasa says. “Add weights on the back of the drill. On the wings, use sufficiently large hydraulic cylinders to get down pressure. Add the weight when needed depending on soil conditions.”
While many early no-till drills came rigged with coulters, Jasa feels that coulters, particularly with large fluted units, disturb too much soil, essentially introducing tillage into no-till systems. “The wider the coulter flute, the more tillage it does,” he says. “A smooth, straight coulter cuts residue and lets the disc openers do their job. A narrow, smooth coulter with the proper weight on it works best if a coulter is needed.
“On pull-type drills, coulters should be smooth — not wavy — or get rid of the coulter and use a double-disc or single-disc opener. Smooth discs work to cut residue when operated at the correct depth. On drills and planters, proper operating depth is important to get the correct residue cutting angle.
Do Your Homework
He adds that drills are capable of flattening the residue to the soil or leaving it standing, depending on the needs of the no-till system.
“Too many people overthink drill and planter attachments and overspend. Get the proper planter or drill level and the right amount of weight, keep the disc openers sharp, and the bearings and chains in good shape,” he says, “and no-till becomes easy. Consider the conditions and what you are planting into.”
“Understanding what’s going on in the whole no-till process, and thinking before buying drill or planter attachments, can help no-till farmers to get the best out of the system.”
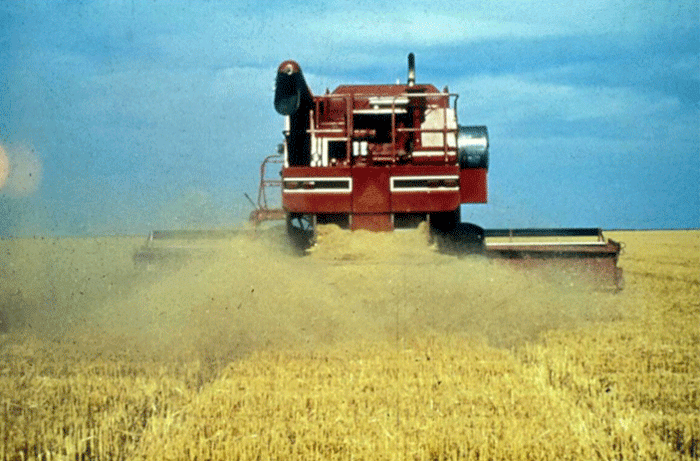
Planting Success in No-till Starts With the CombineBy Jim Steiert While properly configured and adjusted planters and seeders are crucial, Paul Jasa believes no-till planting success with many crops actually starts with the combine. “Spread the residue from the combine correctly and the rest of no-till is easier,” says the University of Nebraska Extension engineer. “On the combine, a straw chopper can be used early in the process of getting established in no-till, but then you want a good straw spreader once the system is in place. I always want a chaff spreader and I operate the combine to provide uniform residue height and uniform straw and chaff spreading.” The height and uniform spreading of residue play a major role in keeping the soil covered. Jasa questions why farmers would think about moving residue out of the way when it can dry out the soil, leaving them wishing for moisture during the summer. “Often, what we think is a planter problem is actually a residue-spreading problem at harvest,” he says. “The better the residue spreaders, the more uniform the residue. “Standing residue gives soil microbes less time to work on residue in the winter. In small grains, a stripper header on the combine leaves crop residue taller, so it lasts longer. Standing residue has an advantage because it’s less likely that winds will carry it away and it keeps the sun and wind off the soil surface to conserve water.” In corn, the header processes residue. Some types leave finer and better-spread residue, while others may leave far more stalk leaning at an angle. “Stalks leaning into the planter are going to snag on every hose or planter attachment. Try to leave stalks leaning the same way you’ll be going with the planter,” Jasa says. “At planting, you want residue lying down to cover the soil. The new crop becomes the standing cover. During the winter, taller residue catches moisture and anchors the soil so that less residue is lost to the wind. When planting time comes, where residue is uniform, the soil temperature and soil moisture will be too.” |