Check The Specs...

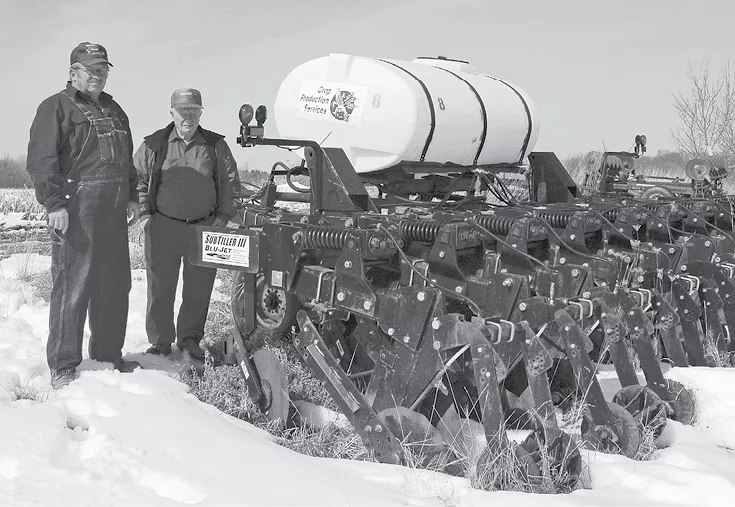
NAME: Floyd Koerner III

LOCATION: Laingsburg, MI

YEARS NO-TILLING: 42

ACRES NO-TILLED: 500 

CROPS NO-TILLED: Corn, soybeans, alfalfa and cover crops

As a family LLC, there’s more than one decision maker on our farm. My dad, Floyd Jr., is the more progressive one. For my part, I like to see someone else try new things out first.

We’ve had lots of friendly family discussions over the years and, with some give-and-take, have hammered out crop-management strategies that work for us.

The main strategy paying dividends today is our fertilizer program. We’re working to refine our program to where we apply the least amount of nitrogen and other inputs while still building yields.

We’ve made great strides through variable-rate applications, banding and splitting applications, and using cover crops. Long before we started working on fertility, though, Dad took the first steps to conservation tillage.

We raise corn, soybeans and alfalfa in the hills near Laingsburg, Mich. The topography has always been a challenge. During the early 1960s, Dad started building and maintaining grass waterways to curb erosion. But a barn fire in 1969 propelled him to the next step in conservation.

The fire claimed our planter and Dad replaced it with a no-till planter. I was 12 years old at the time, and we’ve been no-tilling or strip-tilling since then. We were one of the first farmers in our area to try no-till and have had more than one obstacle to overcome in the last 4 decades.

The Planter Progression

Our no-till planter has seen a number of makeovers throughout the years. One of the first things we did was add no-till coulters. The early no-till coulters were a considerable distance in front of the row units. If there was movement, the seed unit would not follow directly in the path of the coulter and stands would suffer.

Our solution was to add more coulters. We went to two coulters per row, then three. By adding more coulters, we were always planting into soil that was somewhat tilled. We’ve used Rawson coulters since the 1970s with great results.

While moving the soil a bit with coulters helped create a good seedbed, it took a while for us to learn that you can’t no-till wet soil. I think everyone has to learn that the hard way. It’s tempting to roll through a wet spot in the field, but crop performance will struggle. Now we know to plant around it and come back in a few days.

Row cleaners were another great addition to the planter. Before row cleaners, we had issues with hairpinned residue impeding good seed placement. We started with ridged row cleaners and saw improved corn and soybean stands. Eventually, we switched to floating row cleaners and they continue to be beneficial.

Closing-Wheel Dilemma

We’ve had mixed luck with closing wheels. We tried spiked closing wheels after hearing great things about them from other no-tillers at the National No-Tillage Conference. Unfortunately, we proved out the rule that what works on one farm isn’t guaranteed to work on another.

Koerner-8.jpg

After running the spiked closing wheels for half a planting season, we took them off. There was no way to change the down pressure on the closing wheels while we were in the field.

When we transitioned from heavy clay soils to sandy soils, the spiked closing wheel would bury the seed, or catch it and flip it up onto the surface. The settings for the clay soil were running too deep in the sand.

I know they work great in some conditions, but we just don’t seem to have those conditions on our farm. We were in a tough place because the spiked closing wheels didn’t work and we didn’t want to go back to rubber closing wheels. Our harder ground was too tough on rubber closing wheels — there was a lot of maintenance and repair.

Fortunately, we found success with the next set of closing wheels we tried: Schlagel Posi-Close planter wheels. I only put them on two rows of my eight-row planter the first season, but I found the stand count was significantly better with the Schlagel closing wheels than with spiked closing wheels. The following year, we put them on all eight rows.

The Posi-Close wheel is still spiked, but the spikes are bent so they collapse the seed trench without flipping out the seed. We can set them so they’re apart, just touching or even overlap them in hard soils — or where sidewall compaction is a concern.

After all those changes, the planter we use today is an eight-row White planter on a Blu-Jet caddy cart. The caddy has the first Rawson coulter to hit the ground and we use it to inject High NRG-N.

Corn takes up a lot of nutrients as a seedling and that’s when it determines ear size. You want to make sure it has plenty of nutrients at that point.

Behind the caddy, the planter has two additional coulters, floating row cleaners and the Posi-Close spiked closing wheels. The planter is also plumbed to deliver Pro-Germinator as a phosphorus starter. I use Schaffert Rebounders with the Y-Not Split-It delivery tubes to place the starter in the seed trench, but on either side of the seed.

Once you’re happy with your planter setup, keep it in good condition if you plan to be successful at no-till. Every year, we make sure our coulters and opening discs are in good condition, that our rebounders and seed firmers aren’t worn out, and our pop-up tubes are mounted in the right spot.

Checking the down-pressure spring setting is also important to maintain even seed depth. You only get one chance to go through the field, so you better get it right — even if that means slowing down. I sometimes plant at 3.5 to 4 mph, and even slower than that near waterways.

Moving To Strip-Till

No-till worked well for us for years, but we’re always looking for new ways to boost our yields.

Ray Rawson was one of the first guys to produce 100-bushel soybeans and he did it with strip-till. So, after attending a strip-till field day, we headed out to our fields with shovels to see if we could benefit from some strategic, targeted tillage.

We found that we had a compaction layer at about 6 inches below the surface, which wasn’t helping yields. We decided to give strip-till a try, with the goal of getting our corn root mass deeper into the ground to increase yields. Another goal was to reduce fertilizer usage by banding it in the strip-till pass.

That was 7 years ago, and we’ve stuck with the system with great success. We use a Blu-Jet SubTiller III that we’ve modified to strip-till 10 inches deep in the spring, just prior to planting corn and soybeans. We use narrow points on the strip-till unit to make sure we don’t move too much residue.

Adding stainless-steel tubing to the rig allows us to inject liquid fertilizer 6 inches deep during that same pass.

Strip-tilling in the fall is not an option for us because it leaves potash, potassium and nitrogen subject to leeching. Our goal is to conserve our inputs, not waste them.

Since switching to strip-till, we’ve seen our 120-bushel no-till corn average grow to well over 150 bushels. We credit the increase to a couple of factors.

1. The corn roots are reaching deeper than they did when we no-tilled, so they’re taking better advantage of available nutrients and moisture.

2. Strip-tilling creates a warmer, more ideal seedbed, which has led to an increase in final stand for the populations we plant.

Precise Fertility


Koerner-2.jpg

Fertilizer savings have been a great benefit, too. Banding fertilizer with the strip-till unit has cut costs by 40% compared to broadcast applications.

Part of the reduction in fertilizer cost is due to variable-rate applications. We were enticed to try the practice due to a government program aimed at reducing phosphorus pollution in the Maple River watershed.

We’re 5 years in and variable-rate methods have worked well. We’ve reduced fertilizer usage and also paid for the equipment. A Raven controller allows us to adjust rates as we go across the field. Grid sampling, soil type and yield charts help determine the rates.

For nitrogen, we split the application to both prevent pollution and give the plant what it needs, when it needs it.

The first nitrogen application goes down with the planter. Then I do a pre-sidedress nitrogen test and tissue test when the corn is about 6 inches tall to determine sidedress nitrogen rates.

The tests come back in 2 days and I’m usually in the field sidedressing with an injection coulter within a week of taking the samples.

The corn gets another shot of nitrogen in a weed-and-feed pass. I just mix foliar fertilizer with my glyphosate and go. I also try to get another foliar spray in just before the corn tassels to give yield a final push.

I like spoon-feeding nitrogen to reduce the chance it will leech away or run off in heavy rains. It’s used right away, which means it takes less nitrogen per bushel of corn produced.

I don’t mind the extra trips over the field. Extra trips for foliar applications mean I’ve scouted each and every acre to find problem weeds, locate washouts and head off other potential problems.

Error LeadsTo Savings

A planter error uncovered some additional potential savings on our farm a few years back. I was planting soybeans and accidentally made two rounds at 60,000 seeds per acre. I’d already dropped my population down to 165,000 from 200,000 due to seed cost, but didn’t think I could go much further.

Watching those two passes through the growing season, I noticed the soybeans really bushed out and filled the row. And there wasn’t much difference when the combine came through, either.

That population is too low to cover the risk of a poor stand, but it did encourage me to drop my population to 125,000. With the accuracy of the planter, I can get at least 90% to grow and be fine.

Keep Trying Covers

For about 6 years we’ve been planting cover crops to control erosion and carry nitrogen to the next crop.

Some years, the covers are a struggle, but we’ve found that the more years you grow covers, the better they do. The ground becomes softer every year, and I can achieve a stand on a higher percentage of the field with broadcast applications. So, my advice is to stick with it.

Over the years, we’ve tried cereal rye, radishes, clover and annual ryegrass. Last winter, the majority of our cover was a mixture of annual ryegrass and cereal rye.

The reason we mixed the two was to improve the effectiveness of aerial seeding. Annual ryegrass is very light and doesn’t flow well out of the airplane seeder. By mixing cereal rye with it, we get a more even flow and more seeds per acre.

In Michigan, we don’t typically harvest corn until mid-October, so aerial seeding is usually our best bet.

We aim to seed cover crops on all of our soybean and corn acres around the first week of September. Corn has to be a week from turning brown for cover-crop seeding, and we fly them on the soybeans just before leaf drop. On years we’re fortunate enough to harvest early, we drill the cover crops to guarantee a good stand.

Both cereal rye and annual ryegrass grow well through the winter here. Crop residue catches the snow so the plants are protected most of the winter, which means the roots grow deep.

We used to have dairy cattle and would spread manure to build organic matter and nutrients and keep the soil mellow. We got rid of them 20 years ago, though, and cover crops have served to replace the benefits of manure.

Cover crops may end up replacing strip-till for us, too. They’ve added organic matter, held nutrients and improved our soil tilth from top to bottom.